Crochet for Beginners: Hook, Yarn, First Stitches and a 10 cm Square
To start crochet you need one 5.5 mm (US I-9) hook, one ball of smooth, light-colored medium (#4) yarn, scissors and a yarn needle. This guide covers which hook fits which yarn, US vs UK terms, the slip knot, chain and single crochet, and a 12-stitch square that doubles as your gauge check.
By Lionel Rutledge ·
On this page
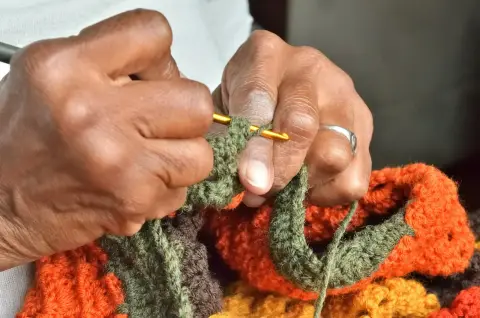
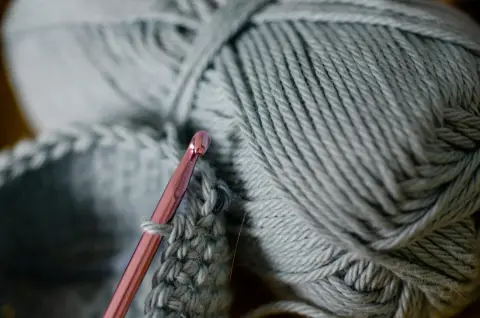
To start crochet you need one hook, one ball of yarn, scissors and a blunt yarn needle. For a first try, take a 5.5 mm (US I-9) hook and a smooth, light-colored medium yarn, the kind labeled #4 or worsted. That pair is easy to see and easy to hold. The first project needs only two stitches: the chain and the single crochet.
This guide stays with one small project from start to finish: a 12-stitch square, about 10 cm (4 in) across. It uses one stitch only. It also tells you whether your hook is right for your hands. The square is an exercise designed for this guide, not a piece we made. Each step follows the published rules linked along the way, and the step diagrams are our own drawings.
Crochet sits with clay in our Other making guides, if you want to see what else ends in something you can hold.
On the table. You need five things for the first square. Lion Brand's beginner guide says beginners "may find it easier to start with medium weight yarn in a light color". It also says the hook size depends on the yarn weight and the gauge you want.
- One ball of medium (#4) yarn, smooth, in a light solid color. Pale grey, cream or a soft yellow. You need to see each loop.
- A 5.5 mm (US I-9) crochet hook. A plain aluminum one is fine. An ergonomic handle is a comfort extra, not a must.
- Small scissors.
- A yarn needle: blunt, with a big eye, for hiding the tails at the end. Shops also call it a darning needle.
- A ruler or tape measure. You will measure the square at the end.
Stitch markers are handy later. A safety pin or a scrap of other yarn does the same job today.
Not yet: a 20-hook set, fuzzy or dark yarn, and steel hooks with crochet thread. A big set mostly teaches you where hooks hide in a sofa. Fuzzy and dark yarns hide the stitches you are trying to learn to read. Steel hooks are, in the Craft Yarn Council's words, "generally used with lace weight yarns and crochet threads". Each of these makes sense once you have a project that needs it. If your yarn is not #4, the hook and yarn table further down gives the matching hook.
Hold the hook and tie a slip knot
Hold the hook in your writing hand and the yarn in the other. There is no single right grip. Lion Brand describes two:
- Pencil grip. Hold the hook like a pencil, with your thumb "on the flat part of the hook, near the thumb rest or grip area".
- Knife grip. Your hand goes over the hook, which you hold "between your thumb and index finger", like a table knife.
Try both for ten chains each. Keep the one that tires your wrist less.
The other hand feeds the yarn. Lion Brand's instruction is to "bring the initial strand of yarn under your pinky, ring finger, or middle finger". Then take it up over your index finger. The finger the yarn runs over is your brake. A little drag gives even loops. Too much drag gives tight chains.
Left-handed? Hold the hook in your left hand and the yarn in your right. Yarnspirations' left-handed guide calls left-handed crochet "basically a mirror-image" of right-handed crochet. You follow "the exact same instructions" but work in the opposite direction, so your rows run from left to right. Simple written patterns work as they are; colorwork patterns may need reversing. Picture the diagrams on this page in a mirror.
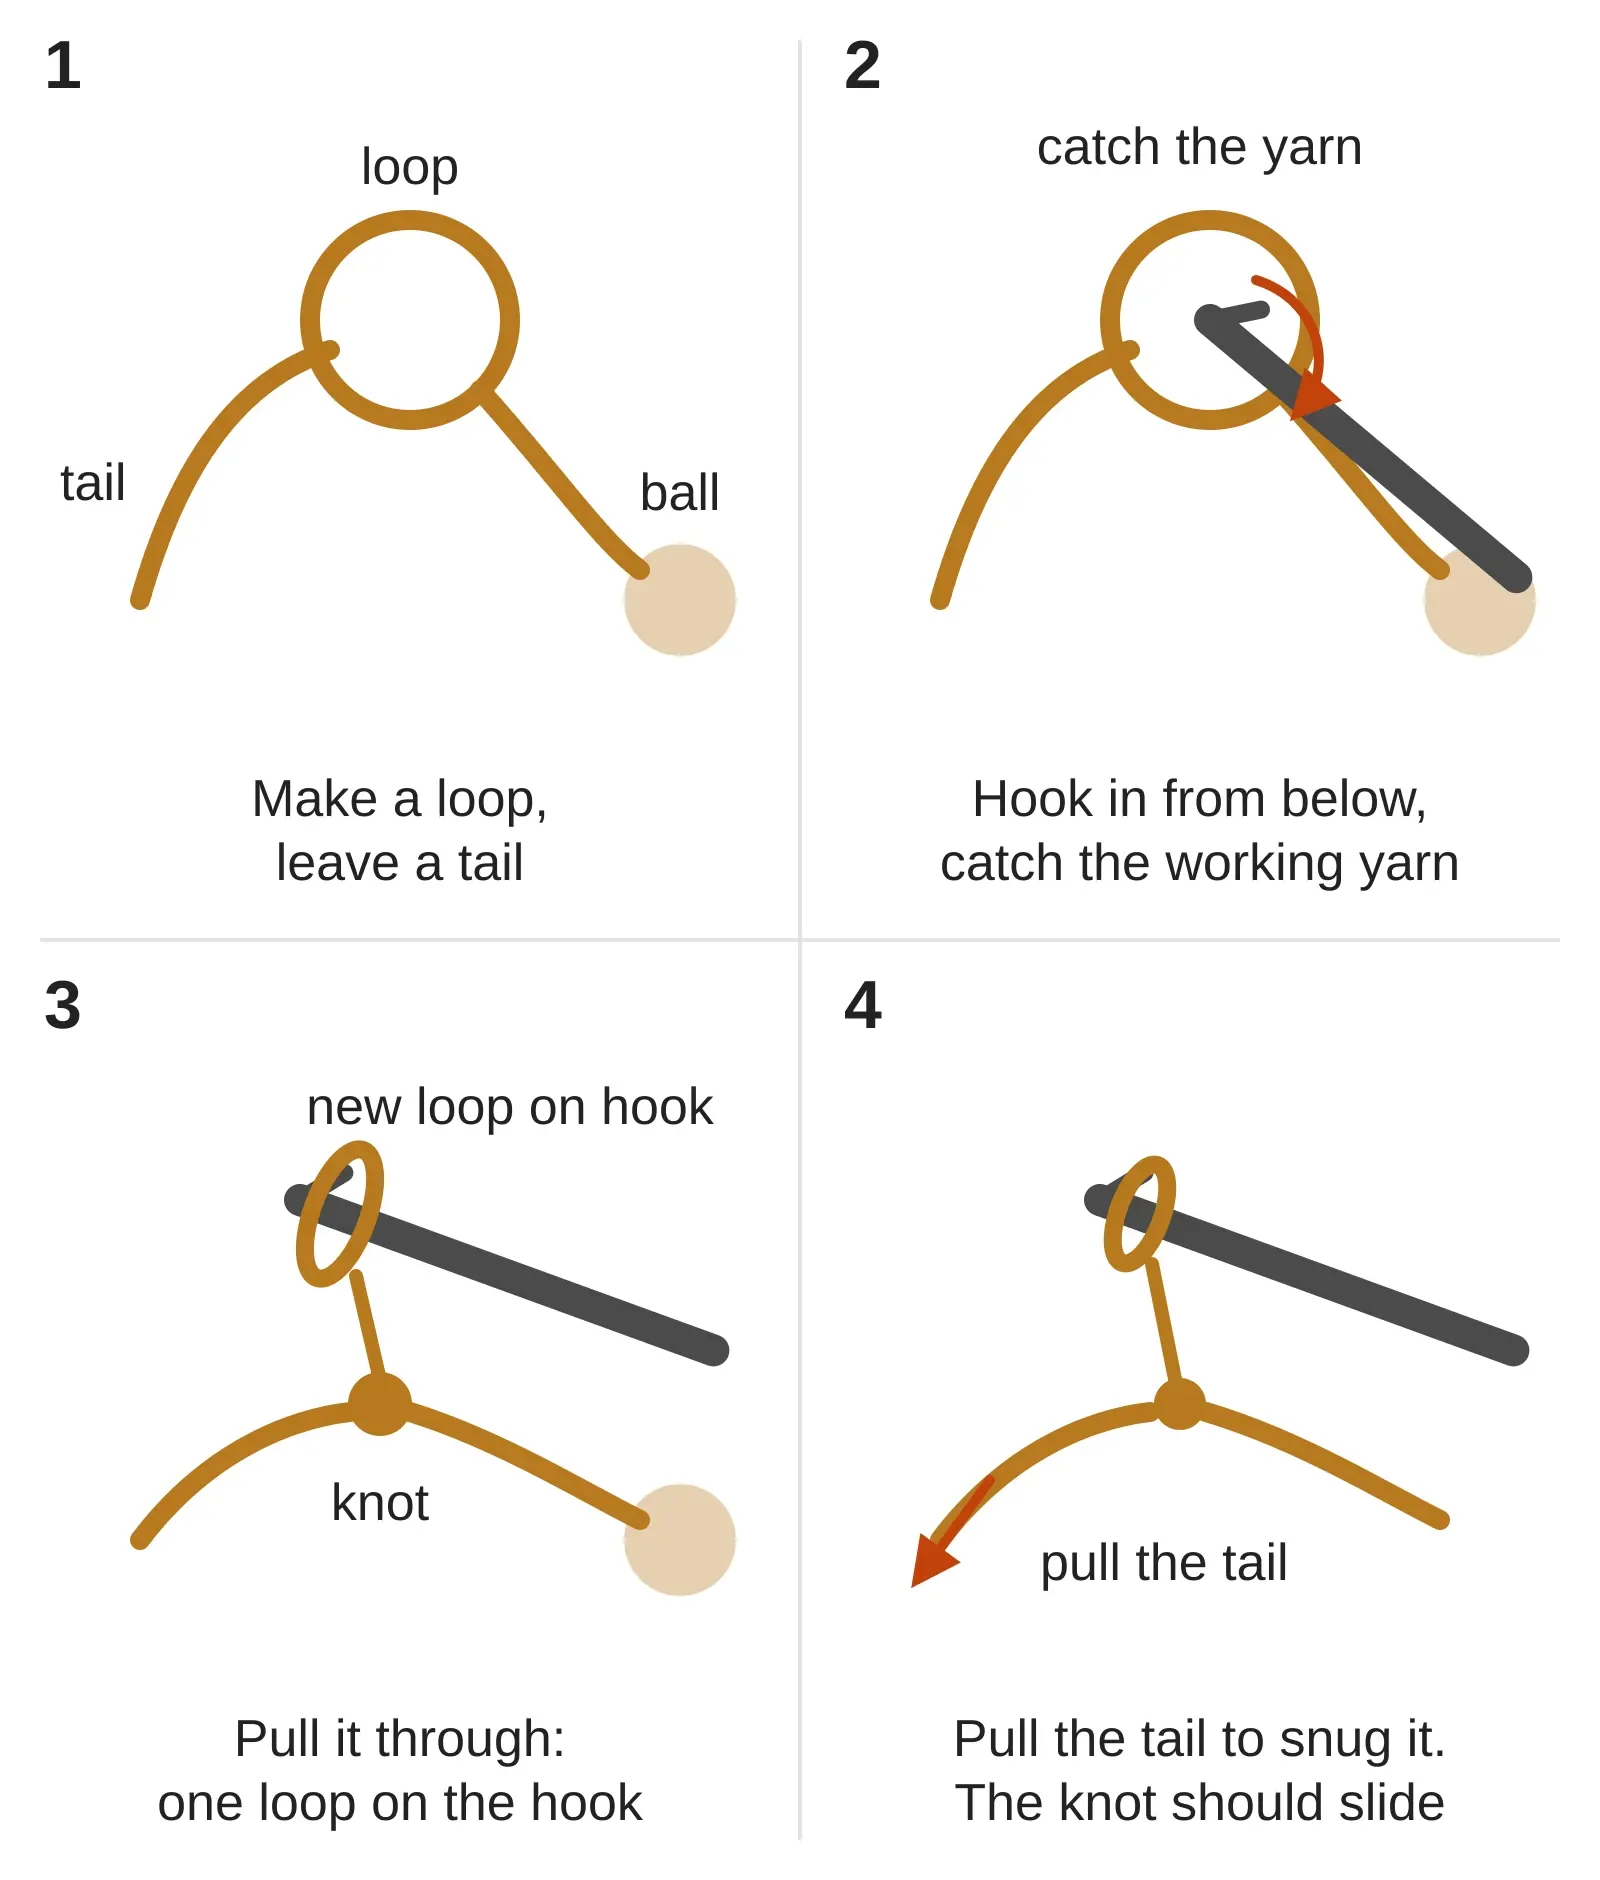
Every project starts with a slip knot:
- Make a loop in the yarn, leaving a tail. Lion Brand says to leave one "long enough to weave in later". About 15 cm (6 in) is comfortable.
- Insert the hook into the loop from underneath and catch the yarn coming from the ball (the working yarn).
- Pull it through to make a new loop on the hook. Pull the tail to tighten it.
Stop here and check: the knot slides when you pull the tail or the working yarn, and the loop moves freely on the hook. If it does not slide, untie it and start again.
The diagram below shows the four moves of the slip knot, seen from a right-handed crocheter's side.
Make a chain, and count it
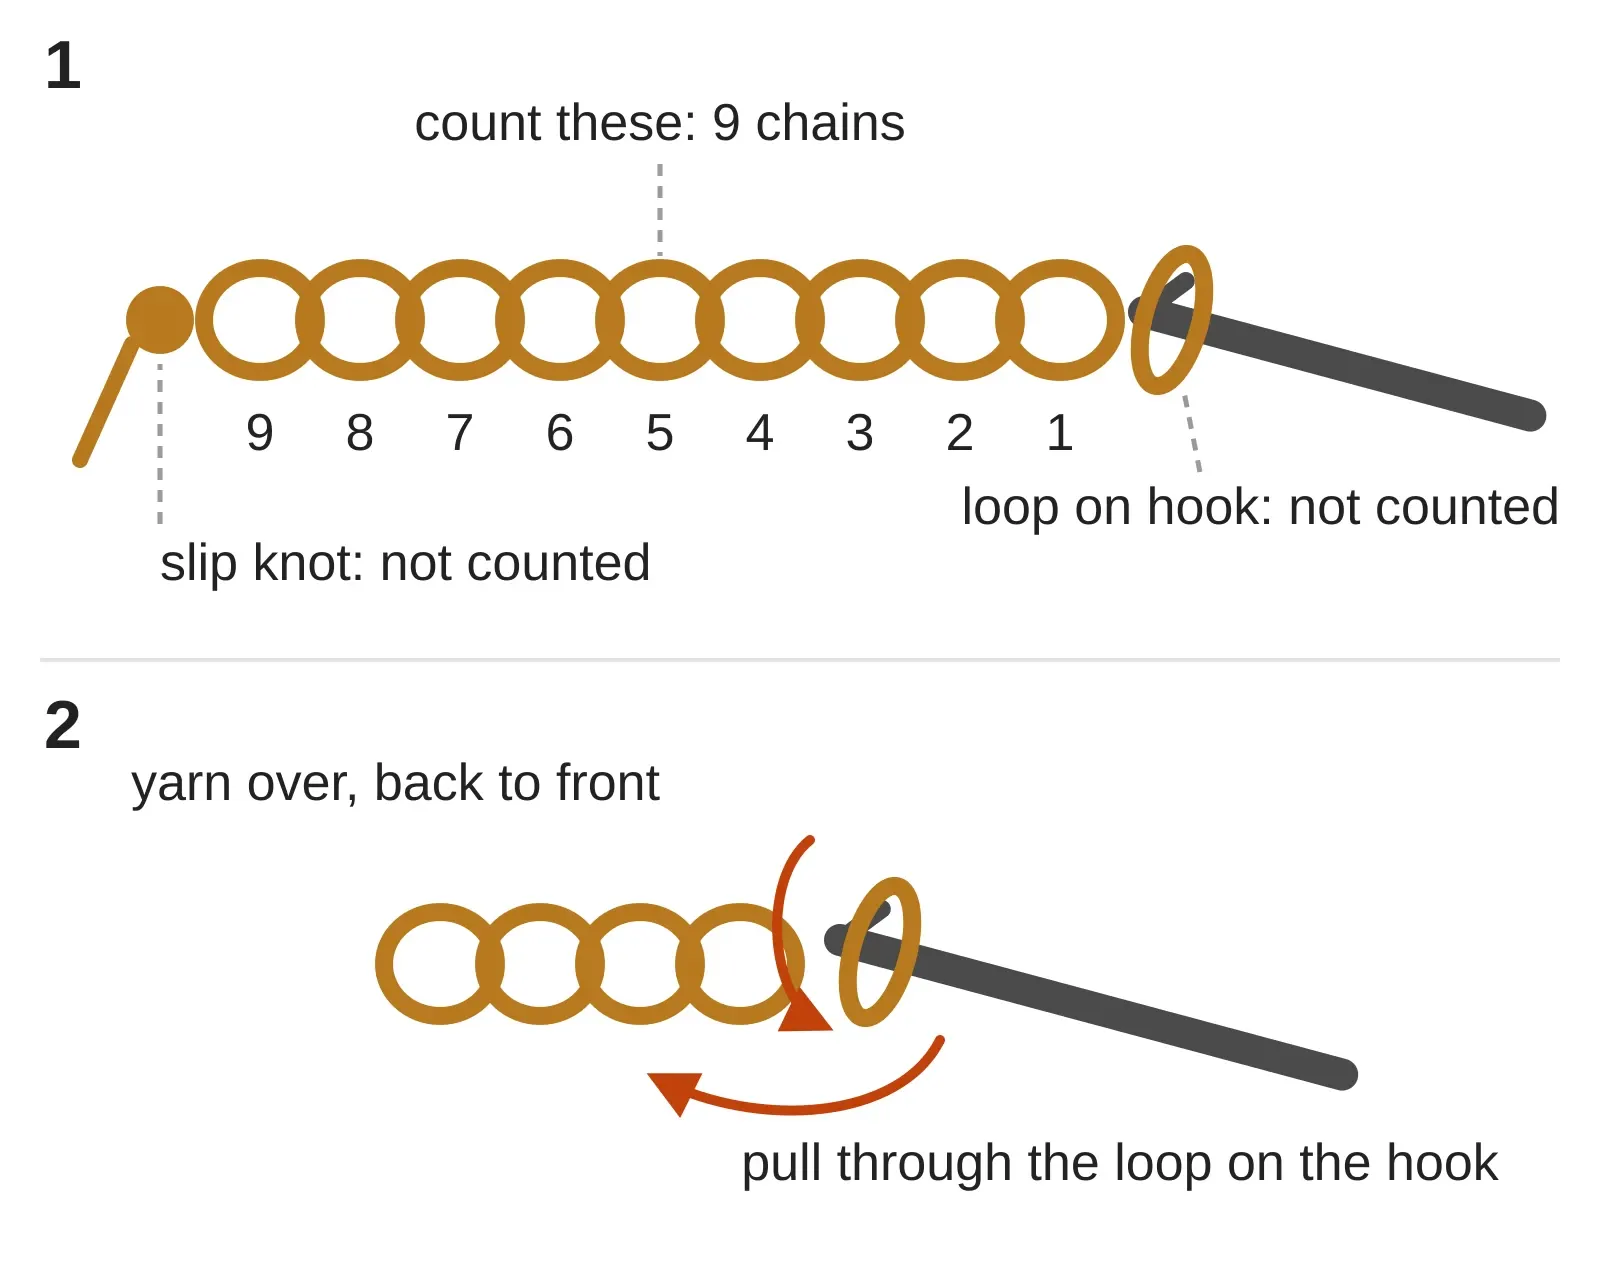
A chain is one loop pulled through another. A row of chains is the foundation of the square.
- Yarn over: bring the yarn over the hook "from back to front", in Lion Brand's words.
- Pull it through the loop on the hook. That is one chain.
- Repeat. Move the fingers of your yarn hand up the chain every few stitches so you are always holding close to the hook.
Each chain looks like a small sideways V. To count them, start next to the hook and work back toward the knot. Lion Brand's stitch guide says: "do not include the slip knot at the end or the loop on your hook as a stitch". The diagram shows what counts and what does not.
Your first single crochet
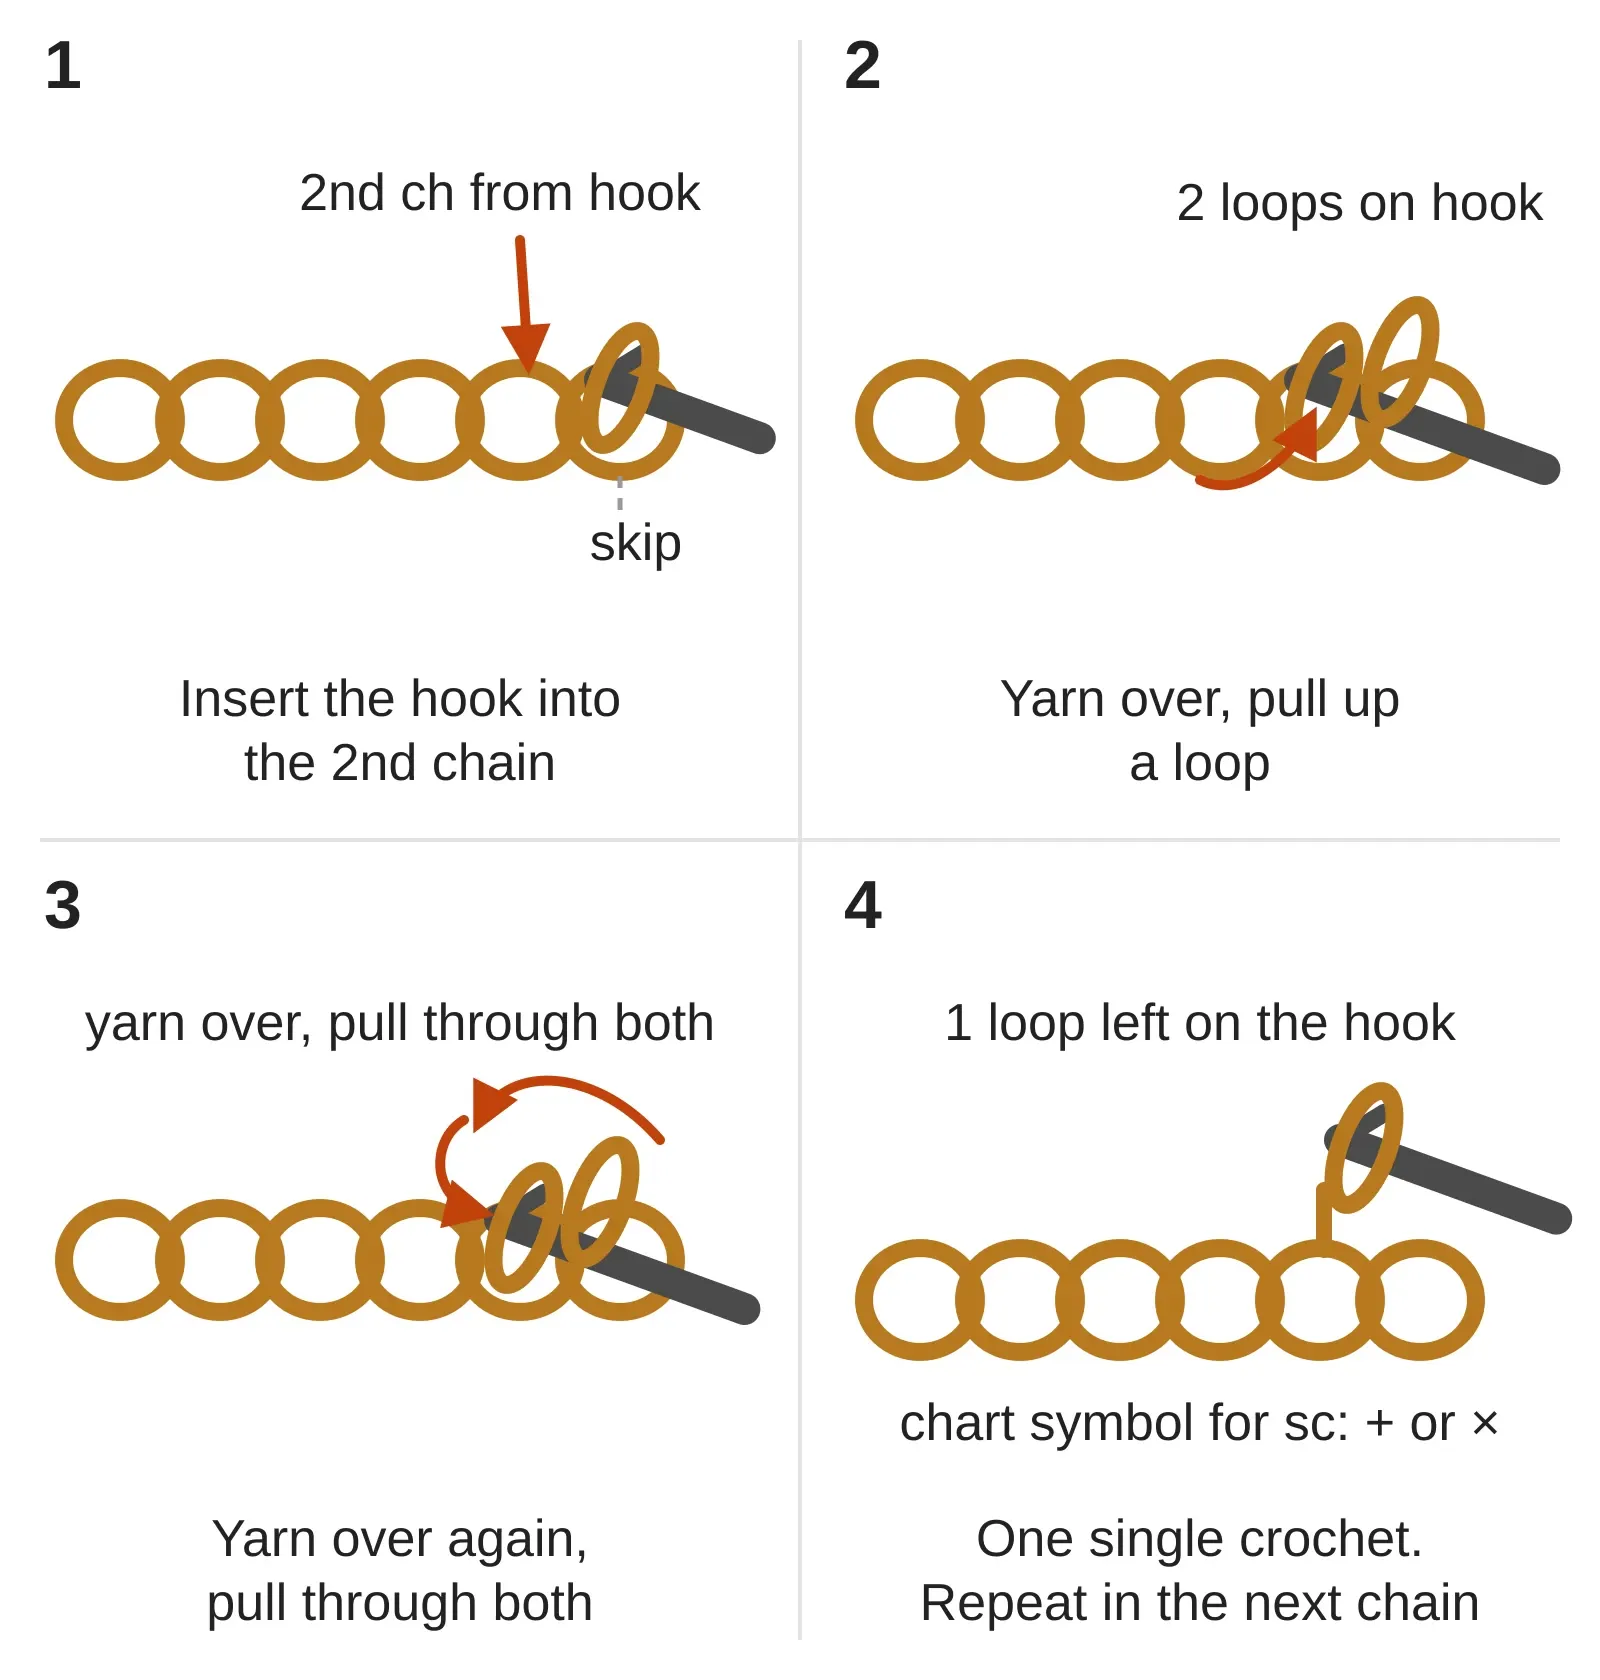
The single crochet (sc) is made in four short moves into the chain.
- Insert the hook into the second chain from the hook. Lion Brand notes the first stitch "is usually the second chain from the hook".
- Yarn over and pull the yarn through the chain. You now have two loops on the hook.
- Yarn over again and pull through both loops. One single crochet is done.
- Insert the hook into the next chain and repeat.
Apart from the slip stitch, the single crochet is the shortest common stitch and the best one to learn first. Taller stitches (half double, double and treble) follow the same pattern with extra yarn overs. They come after the first square. The diagram shows the four moves in order.
Row 2: turn, and where the hook goes
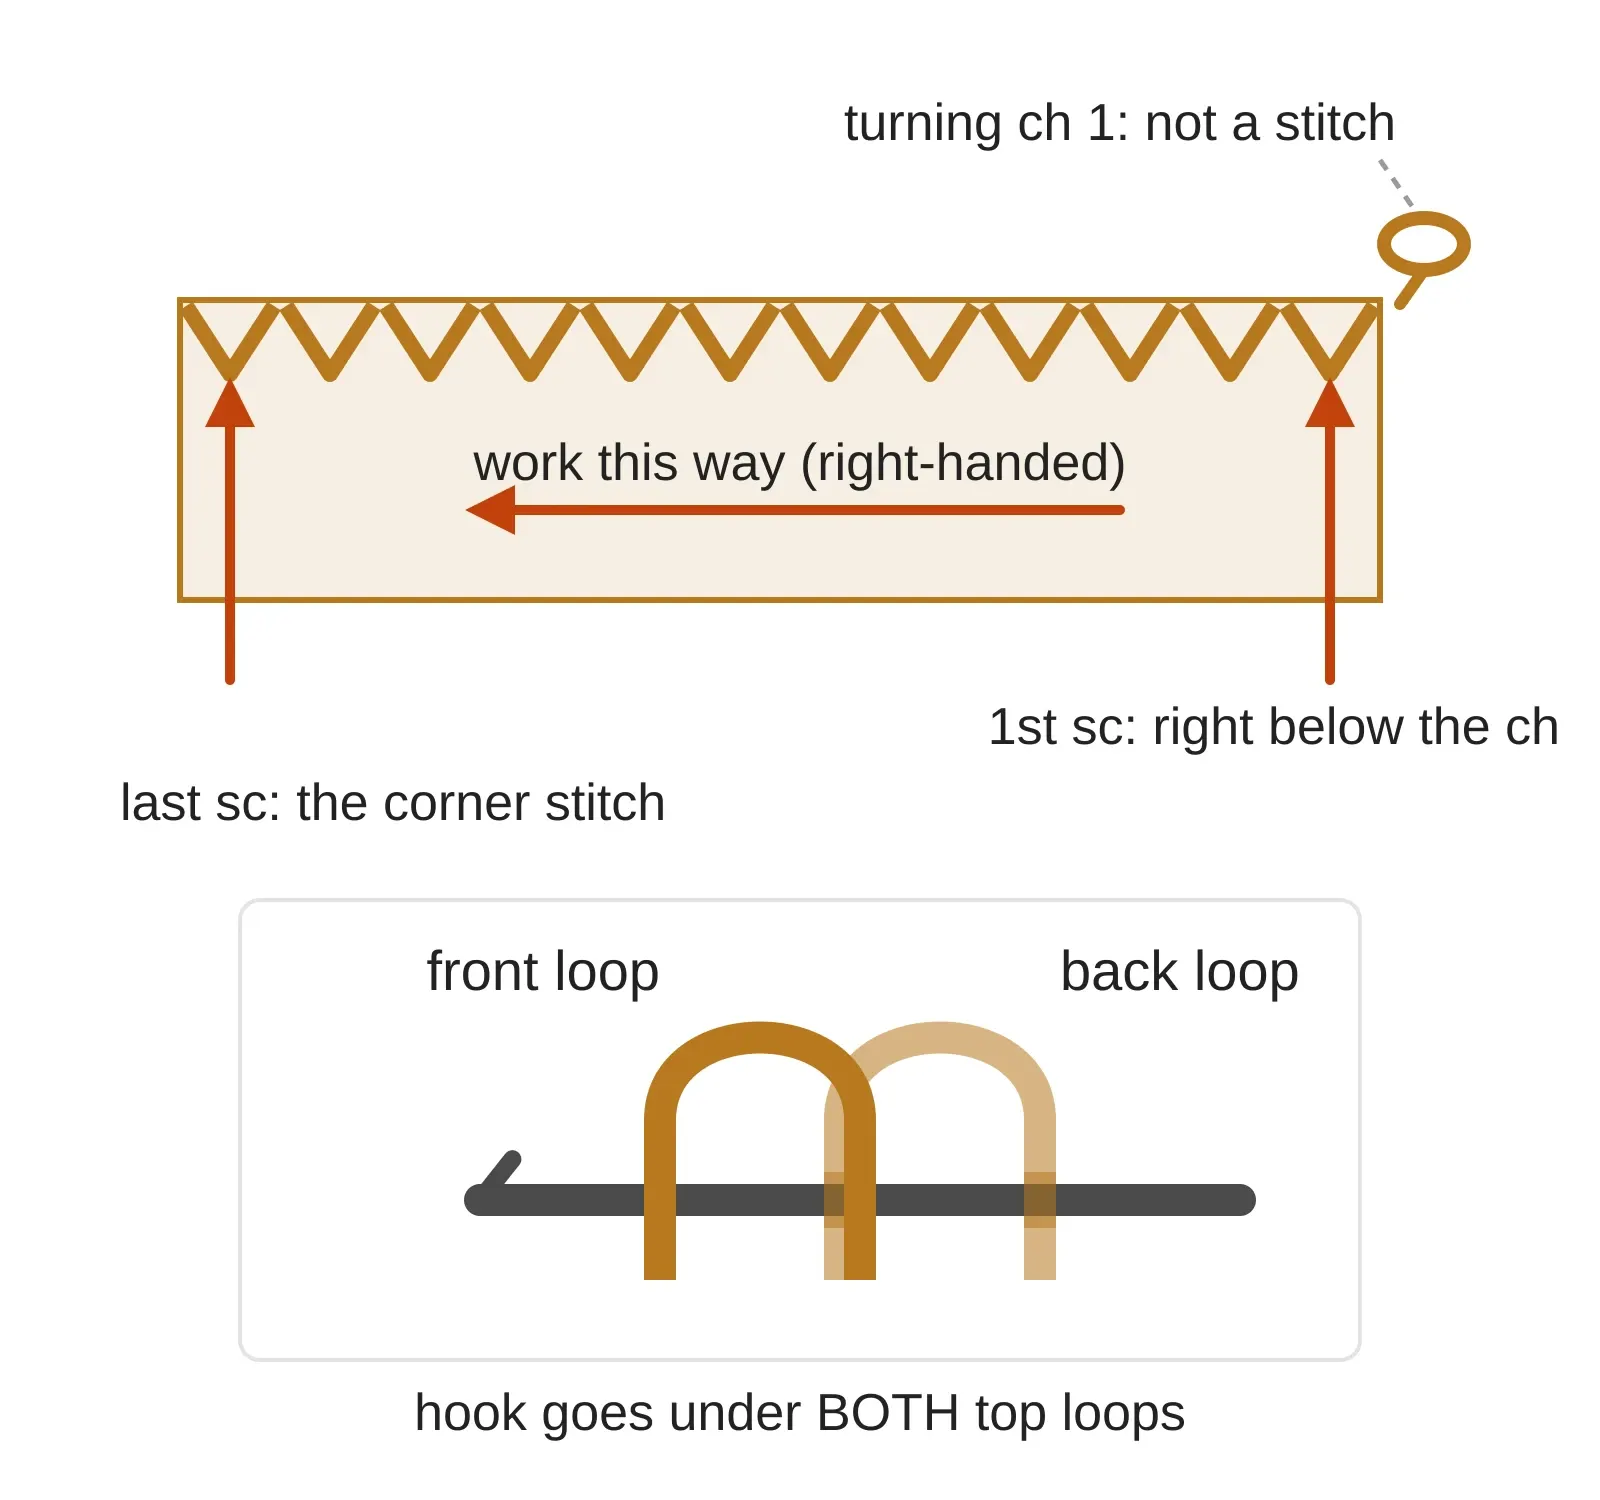
At the end of a row you chain 1 and turn the work over. That chain lifts the yarn to the height of the next row. In single crochet it is not a stitch. Lion Brand's turning chain glossary is direct about it. "The turning chain worked at the beginning of a single crochet row does not count as a stitch". So your first single crochet goes into the first stitch of the row, right below the chain. On the way back, you do not work into the chain.
From row 2 on, the hook goes into the top of a stitch, not into a chain. Lion Brand's stitch guide explains that "each crochet stitch has 2 loops on the top of the stitch". Insert the hook under both top loops of the V. The same guide says that is the usual way, and that a pattern will tell you when to use only the front or back loop.
Taller stitches use taller turning chains: two for half double, three for double, four for treble, per the same glossary. For double and treble the turning chain usually does count as the first stitch. For half double, sources differ. Lion Brand's glossary counts it. The Crochet Guild of America's half double lesson says instead to ignore the chain 2 at the end of the row. Follow your pattern. That difference is a common reason rows grow or shrink.
The diagram shows a row seen from the front: the turning chain, the first and last stitch, and one stitch top with the hook under both loops.
Read the pattern for your first square
A crochet pattern is short-hand for the moves above. Here is the full pattern for the first project, then the same lines in plain words.
The 12-stitch square (US terms)
Hook: 5.5 mm (I-9). Yarn: #4 medium. >Ch 13. >Row 1: Sc in 2nd ch from hook and in each ch across, turn. (12 sc) >Row 2: Ch 1, sc in each st across, turn. (12 sc) >Rows 3–15: Rep Row 2. >Fasten off. Weave in ends.
Scroll sideways for all 2 columns.
| Pattern text | What you do |
|---|---|
| Ch 13 | Make a slip knot, then 13 chains. Count the Vs, not the knot or the loop on the hook. |
| Sc in 2nd ch from hook | Skip the chain next to the hook. Make your first single crochet in the one after it. |
| and in each ch across | One single crochet in every chain to the end. |
| turn | Turn the work over so the back faces you. |
| (12 sc) | The stitch count. You should now have 12 stitches. It is a check, not something to make. |
| Ch 1, sc in each st across | Chain 1 (not a stitch), then one single crochet under both top loops of each of the 12 stitches. |
| Rep Row 2 | Repeat the Row 2 instructions. |
| Fasten off | Cut the yarn and pull the tail through the last loop. |
The Craft Yarn Council's guide to reading a crochet pattern explains why 13 chains give 12 stitches. Its own example starts with 15 chains, skips the first one and ends with "14 single crochet stitches". The same guide shows the count written three ways, after a colon, in parentheses or after a dash. Either way it is a number to check, not an instruction.
Two more marks you will meet soon. An asterisk () marks a repeat. So "sc in next 2 sts, 2 sc in next st; rep from * across" means: work the part after the asterisk, then do it again until the row ends. Square brackets [ ] tell you how many times to work a step. The Council's abbreviations list adds that parentheses ( ) can also mean "a group of stitches all in the same stitch or space".
Patterns also carry a skill level. The Council's project levels start at Basic: "Projects using basic stitches. May include basic increases and decreases." That is the level to look for after this square.
Make the 12-stitch square
The square is a first project and a test at the same time. It was sized from the Red Heart Super Saver label gauge of 12 single crochet and 15 rows over 4 in (10 cm). So if your hook, yarn and hands match that gauge, 12 stitches and 15 rows come out at about 10 by 10 cm. If they do not match, the square shows you which way to change the hook. You only learn something new in one place: everything is single crochet.
- Foundation. Make a slip knot and 13 chains. Keep them loose enough that the hook slides into each one.
- Row 1. Single crochet into the second chain from the hook and into every chain after it. Turn.
Stop here and check: count the stitches along the top. You need 12. If you have 11 or 13, pull the yarn out to the chain and work the row again. A wrong count in row 1 follows you all the way up.
- Row 2. Chain 1. Single crochet into the first stitch, the one right below the chain, and into every stitch to the end, always under both top loops. The last stitch hides at the corner, so look for it. Turn.
- Rows 3 to 15. Repeat row 2. Count to 12 at the end of every row. The Craft Yarn Council's own advice is: "Count the stitches at the end of every row."
- Fasten off. Cut the yarn, leaving a 15 cm tail. Yarn over and pull the tail through the loop on your hook.
- Weave in the ends. Thread each tail on the yarn needle. Lion Brand's tip is to weave them "back and forth into the stitches on the backside of your project". Then trim what is left.
Stop here and check: lay the square flat and measure it. Around 10 cm (4 in) each way means your gauge matches the label. Write the result down. It is the most useful number you will collect this week.
Keep it as your gauge swatch, use it as a coaster for a cold glass, or make more and join them into something bigger later.
When the square goes wrong
Most first squares go wrong in a few familiar ways, and each one has a cause you can find. Look for the symptom, then try the smallest fix first.
Scroll sideways for all 3 columns.
| What you see | Likely cause | Fix |
|---|---|---|
| The square gets narrower as it grows | You missed a stitch, usually the first one right below the turning chain or the last one hiding at the corner | Count to 12 after each row. Lion Brand's glossary puts the first single crochet "in the stitch below the turning chain" |
| The square gets wider | You worked into the turning chain, which is not a stitch in single crochet | Skip it. The same glossary says: "You will not work in the turning chain on the return row" |
| Bigger than 10 cm | Your stitches are larger than the label gauge | Try a smaller hook. The Craft Yarn Council's hook guide says a swatch larger than the gauge calls for a smaller hook |
| Smaller than 10 cm, or the fabric feels stiff | Your stitches are smaller than the label gauge | Try a larger hook, the same guide's rule the other way round |
| The fabric curls | The hook is too small for the yarn | LoveCrafts notes that curl at the bottom edge usually means the hook is too small for the yarn. Go up one size |
| You can hardly get the hook into the chains | The chain is too tight | Loosen the brake finger, or chain with a bigger hook. Lion Brand says that when starting a new project you can use a hook "one or two sizes larger" |
A messy first square is normal and still useful. It is the proof of what to change on the second one.
Which hook goes with which yarn
Match the hook to the yarn weight, and when the ball band (the paper label) gives a hook size, use that one. The Craft Yarn Council, the US industry body that publishes the yarn weight numbers you see on labels, gives these crochet ranges in its Standard Yarn Weight System. The last column is our advice for a first project.
Scroll sideways for all 6 columns.
| Label number and name | Also sold as | Single crochet per 4 in (10 cm) | Hook, mm | Hook, US | For a beginner? |
|---|---|---|---|---|---|
| 0 Lace | fingering, 10-count crochet thread | 32–42 double crochet | steel 1.6–1.4; regular 2.25 | steel 6, 7, 8; regular B-1 | Later |
| 1 Super Fine | sock, fingering, baby | 21–32 | 2.25–3.5 | B-1 to E-4 | Later |
| 2 Fine | sport, baby | 16–20 | 3.5–4.5 | E-4 to 7 | Later |
| 3 Light | DK, light worsted | 12–17 | 4.5–5.5 | 7 to I-9 | Yes, second choice |
| 4 Medium | worsted, afghan, aran | 11–14 | 5.5–6.5 | I-9 to K-10½ | Yes, start here |
| 5 Bulky | chunky, craft, rug | 8–11 | 6.5–9 | K-10½ to M-13 | Possible, after the first square |
| 6 Super Bulky | super bulky, roving | 7–9 | 9–15 | M-13 to Q | Later |
| 7 Jumbo | jumbo, roving | 6 and fewer | 15 and larger | Q and larger | Later |
If your label says DK or aran instead of a number, the table places DK in #3 and aran in #4. So aran and the same 5.5 mm hook make a good UK start.
The Council calls these "GUIDELINES ONLY". Its hook page adds that you should "always complete a gauge swatch and compare it to the pattern gauge information". Gauge is the number of stitches and rows over a set size, usually 10 cm (4 in). UK patterns call it tension.
Here is why the label wins. Red Heart Super Saver, a common US acrylic, is labeled #4 Medium. Its crochet gauge is "12 sc x 15 r with 5.5 mm (US I/9) Crochet Hook" over 4 in (10 cm). That sits at the small end of the #4 range, which runs up to 6.5 mm. So a different #4 yarn can ask for a bigger hook. Same category, different hook.
Read the millimeters, not the letter
Buy hooks by the millimeter size. The Craft Yarn Council's hook table warns that letter and number sizes "vary from company to company". Its own list shows the problem: "G" appears against 4 mm (G-6) and against 4.25 mm (G).
Scroll sideways for all 2 columns.
| Hook, mm | US size |
|---|---|
| 3.5 | E-4 |
| 4 | G-6 |
| 5 | H-8 |
| 5.5 | I-9 |
| 6 | J-10 |
| 6.5 | K-10½ |
| 8 | L-11 |
| 9 | M/N-13 |
Steel hooks run the other way. On the same page: "the higher the number, the smaller the hook."
US and UK terms: the key
US and UK patterns use the same names for different stitches. A UK "double crochet" is a US single crochet. Read a pattern in the wrong system and every stitch comes out one step too tall or too short. This table is from the Craft Yarn Council's abbreviations page; the "miss" row is from LoveCrafts.
Scroll sideways for all 2 columns.
| US term | UK term |
|---|---|
| slip stitch (sl st) | slip stitch (ss) |
| single crochet (sc) | double crochet (dc) |
| half double crochet (hdc) | half treble (htr) |
| double crochet (dc) | treble (tr) |
| treble (tr) | double treble (dtr) |
| double treble (dtr) | triple treble (trtr) |
| gauge | tension |
| yarn over (yo) | yarn over hook (yoh) |
| skip | miss |
The chain (ch) is the same in both.
Which terms does my pattern use? Most patterns say so. LoveCrafts notes that a pattern "will usually specify whether to use US or UK terms". If yours does not, three quick tests based on the table above:
- It mentions single crochet or sc: US terms. The UK list has no single crochet.
- It mentions half treble or htr: UK terms. The US list has no half treble.
- It only uses dc and tr: you cannot tell from the words alone. Check the designer's notes and where the pattern was published. LoveCrafts' table also shows that Australian patterns use the UK names.
This guide uses US terms throughout.
What to make next
Make the same square once more with whatever change the table pointed to. Then learn one taller stitch at a time. The half double and double crochet are the next two, and our guide to crochet stitches shows each one with its symbol and where it fits best.
One small exercise to finish: crochet three squares, each 12 stitches wide. Make one in single crochet, one in half double and one in double. The stitches guide gives the starting chain for each. Put them side by side. You will see at once how stitch height changes the fabric, and that picture will help you choose stitches for a real project. When you want ideas for things that get used every day, the functional art guide is a good place to look.