How to Draw Hands: Build Three Poses From Simple Shapes
Build a hand from a palm block, finger cylinders and a thumb wedge, check three proportions, then soften the edges. An open hand, a fist and a pointing hand in four stages each, plus a checklist for when it looks wrong.
By Lionel Rutledge ·
On this page
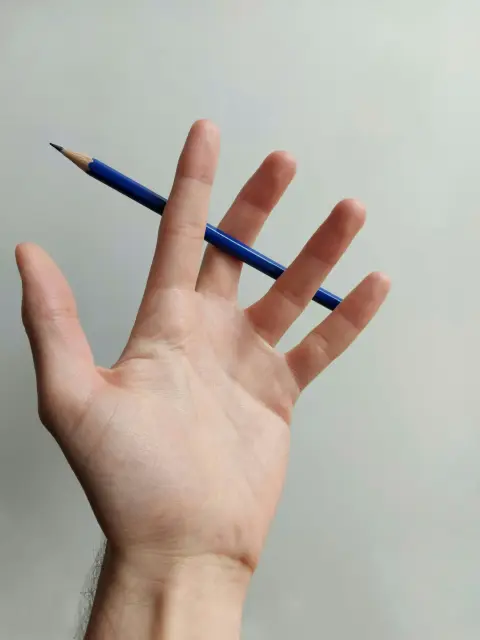
To draw a hand, build it from simple shapes before you draw any skin. Use a box for the palm, three short cylinders for each finger and a wedge for the thumb. Check three proportions with light lines, then soften the edges and add knuckles and nails last.
Hands feel hard for two reasons. They have many parts that move on their own, and you look at hands all day, so a small error jumps out at once. Building the hand from blocks first helps with both.
This page builds three poses in four stages each. They are an open hand seen from the back, a fist and a pointing hand seen from the side. Hands with the fingers pointing straight at you are left out on purpose. Foreshortening (parts pointing at you look shorter) is a good second lesson, not a first one.
What you need on the table:
- A pencil. An HB or a 2B. Any pencil you can draw light lines with will do.
- Plain paper. Printer paper is fine. You will fill a few sheets with blocks you throw away.
- An eraser. For the construction lines you do not keep.
- Your other hand, or a photo of it. Clip Studio's Art Rocket hands guide says it directly: "The best reference is looking at your own hands using a mirror or a camera". Prop your phone up and photograph the pose you want to draw.
Don't buy yet: a wooden hand model, an anatomy book or a drawing tablet. None of them will fix a finger that is too long. You already own a hand model, and it came with free delivery.
Keep every construction line light. Proko's hand lesson puts it plainly: "Until you've figured out all the basic information, you shouldn't draw any details."
Which proportions make a hand look right?
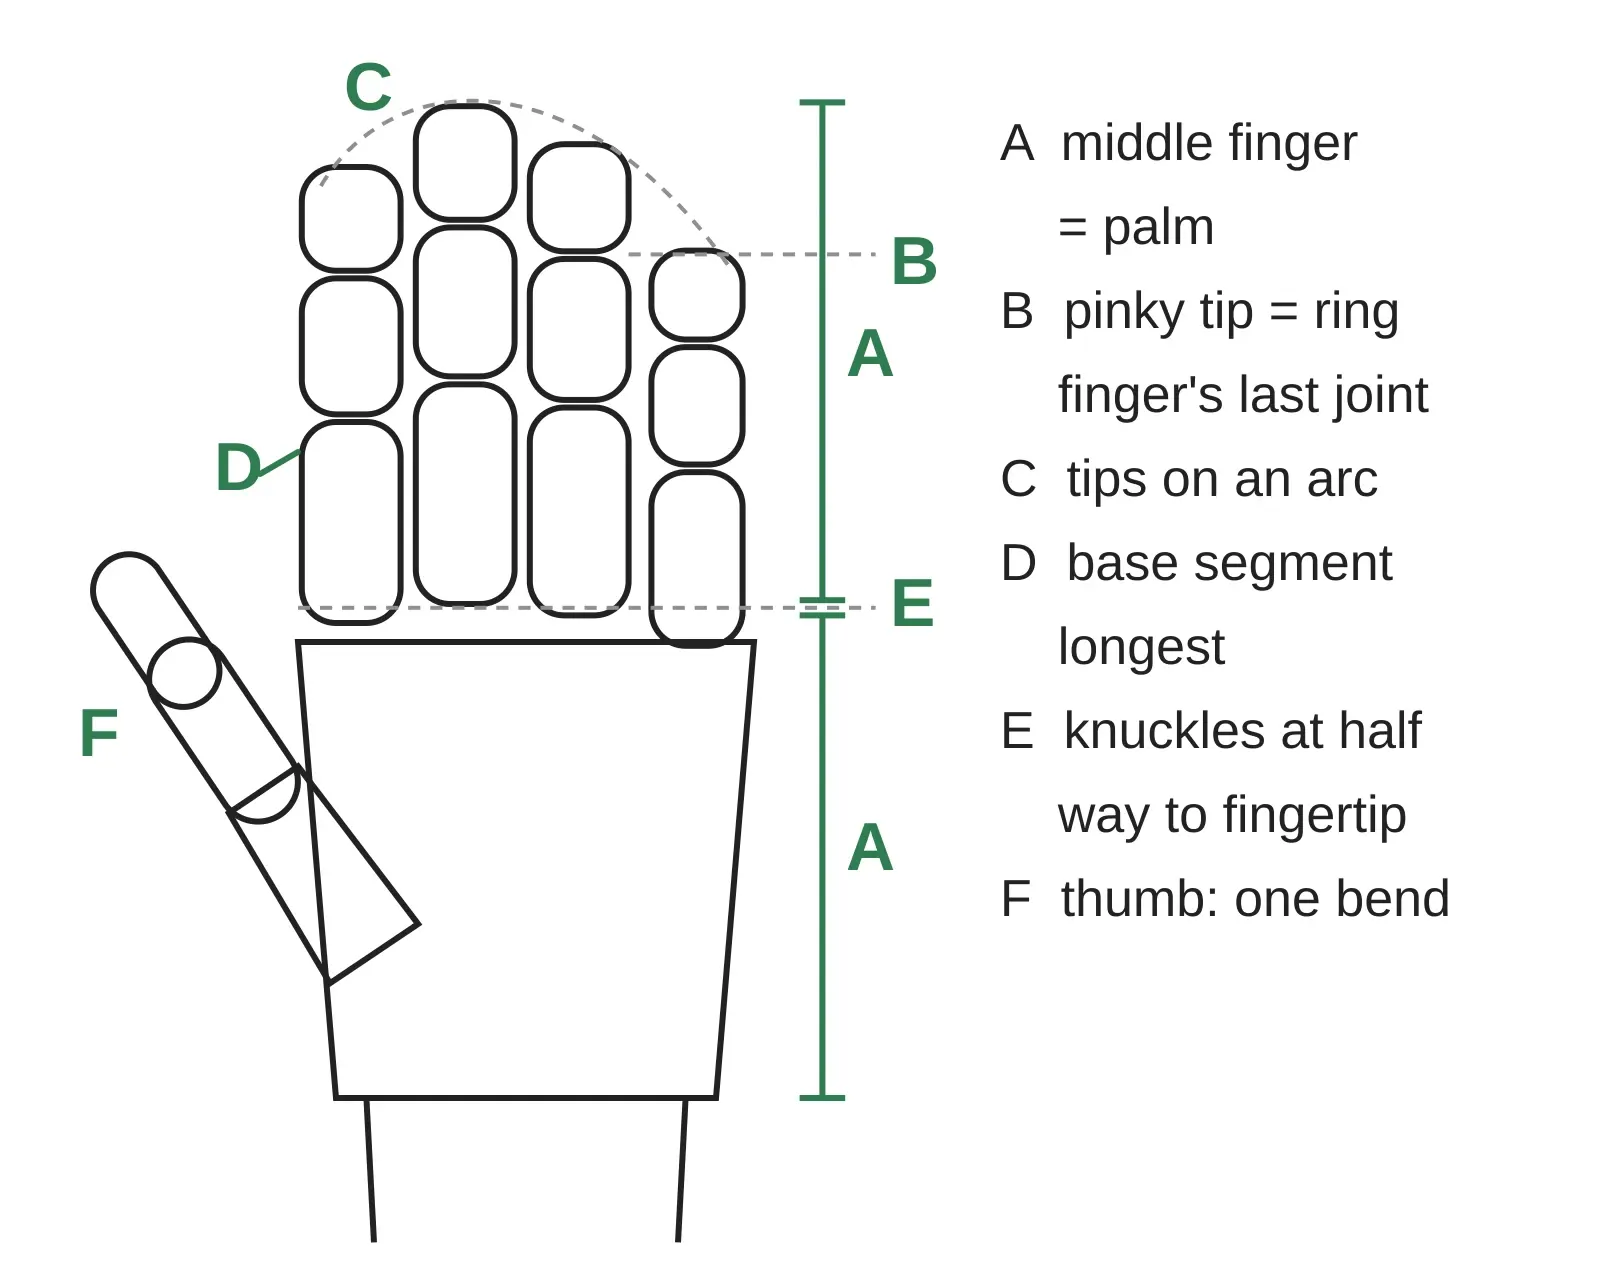
Three checks catch most mistakes. The middle finger is about as long as the palm. The knuckles sit halfway between the wrist and the tip of the middle finger. The pinky tip reaches about the last joint of the ring finger.
The table collects the rules this page uses, with the guide each one comes from. The lettered diagram at the end of this section puts the main checks on one hand. Treat them as starting points: hands differ from person to person.
Scroll sideways for all 3 columns.
| Check | The rule | Who says so |
|---|---|---|
| Palm shape | A trapezoid, "just a bit wider at the top than the bottom". A box "with equal height and width" works too. | Clip Studio, MsRedNebula; Proko |
| Four fingers | Split the top of the palm into four equal parts, one per finger. | Both guides above |
| Middle finger | The longest. Its length equals the distance from the bottom of the palm to the top of the knuckle curve. | Clip Studio, MsRedNebula |
| Knuckle line | Halfway from the wrist to the middle fingertip. Proko adds that the method "is based on the length of the bone, not the skin". | Proko lesson notes |
| Index and ring finger | A little shorter than the middle finger. They may be the same length, and that varies between people. | Clip Studio, MsRedNebula |
| Pinky | The tip comes to around the last joint of the ring finger. Its exact length also varies. | Clip Studio, MsRedNebula |
| Segments | Three per finger. The bottom one is the longest, and they get shorter toward the tip. | Clip Studio, MsRedNebula; Proko notes |
| Thumb | Two segments past its palm bone, with one visible bend. Just shorter than the index finger's middle joint. | Proko notes; Clip Studio, MsRedNebula |
| Whole hand | "about equal to the length of the face" | Proko notes |
Where quick answers get it wrong
We asked an AI chatbot about hand proportions on 13 November 2026. Its answer described the palm as wider at the bottom, made the ring finger shorter than the index and made the pinky half as long as the middle finger. The palm and pinky rules clash with the guides above. The palm widens toward the knuckles, and the pinky tip is measured against the ring finger's last joint. The ring finger rule holds only for some hands.
The ring finger rule deserves a second look. Wikipedia's digit ratio article summarises studies that compare the index and ring fingers. It reports that males have, on average, a lower index-to-ring ratio than females, which means a relatively longer ring finger. So do not draw every ring finger shorter than the index. Look at the hand you are drawing.
The teaching sources disagree on one point. A Clip Studio tip by hanabi02 says finger joints sit in "3 equal pieces". MsRedNebula's guide makes the bottom segment the longest. Proko's halving method also makes the base segment the longest: "To find the three finger joints, divide in half again, and again." This page draws the base segment longest.
What changes when the palm faces you?
The blocks stay the same. MsRedNebula's guide says "from underneath, the hand blueprint is the same as it is from the top". Three things look different, though:
- The fingers look shorter. The skin between the fingers reaches past the knuckles, about halfway to the first joint, as Proko's notes point out. Do not stretch the fingers to match the back view.
- The shapes get softer. Round off the blocks a little more than on the back. Art Rocket puts it this way: "The more you see the palm side of the hand the softer the shapes become."
- The creases are not the joints. The bending marks on the palm side "do not necessarily line up with the joints", Art Rocket notes. Draw the lines you see, not where you expect the joints to be.
Pose 1: the open hand, back view
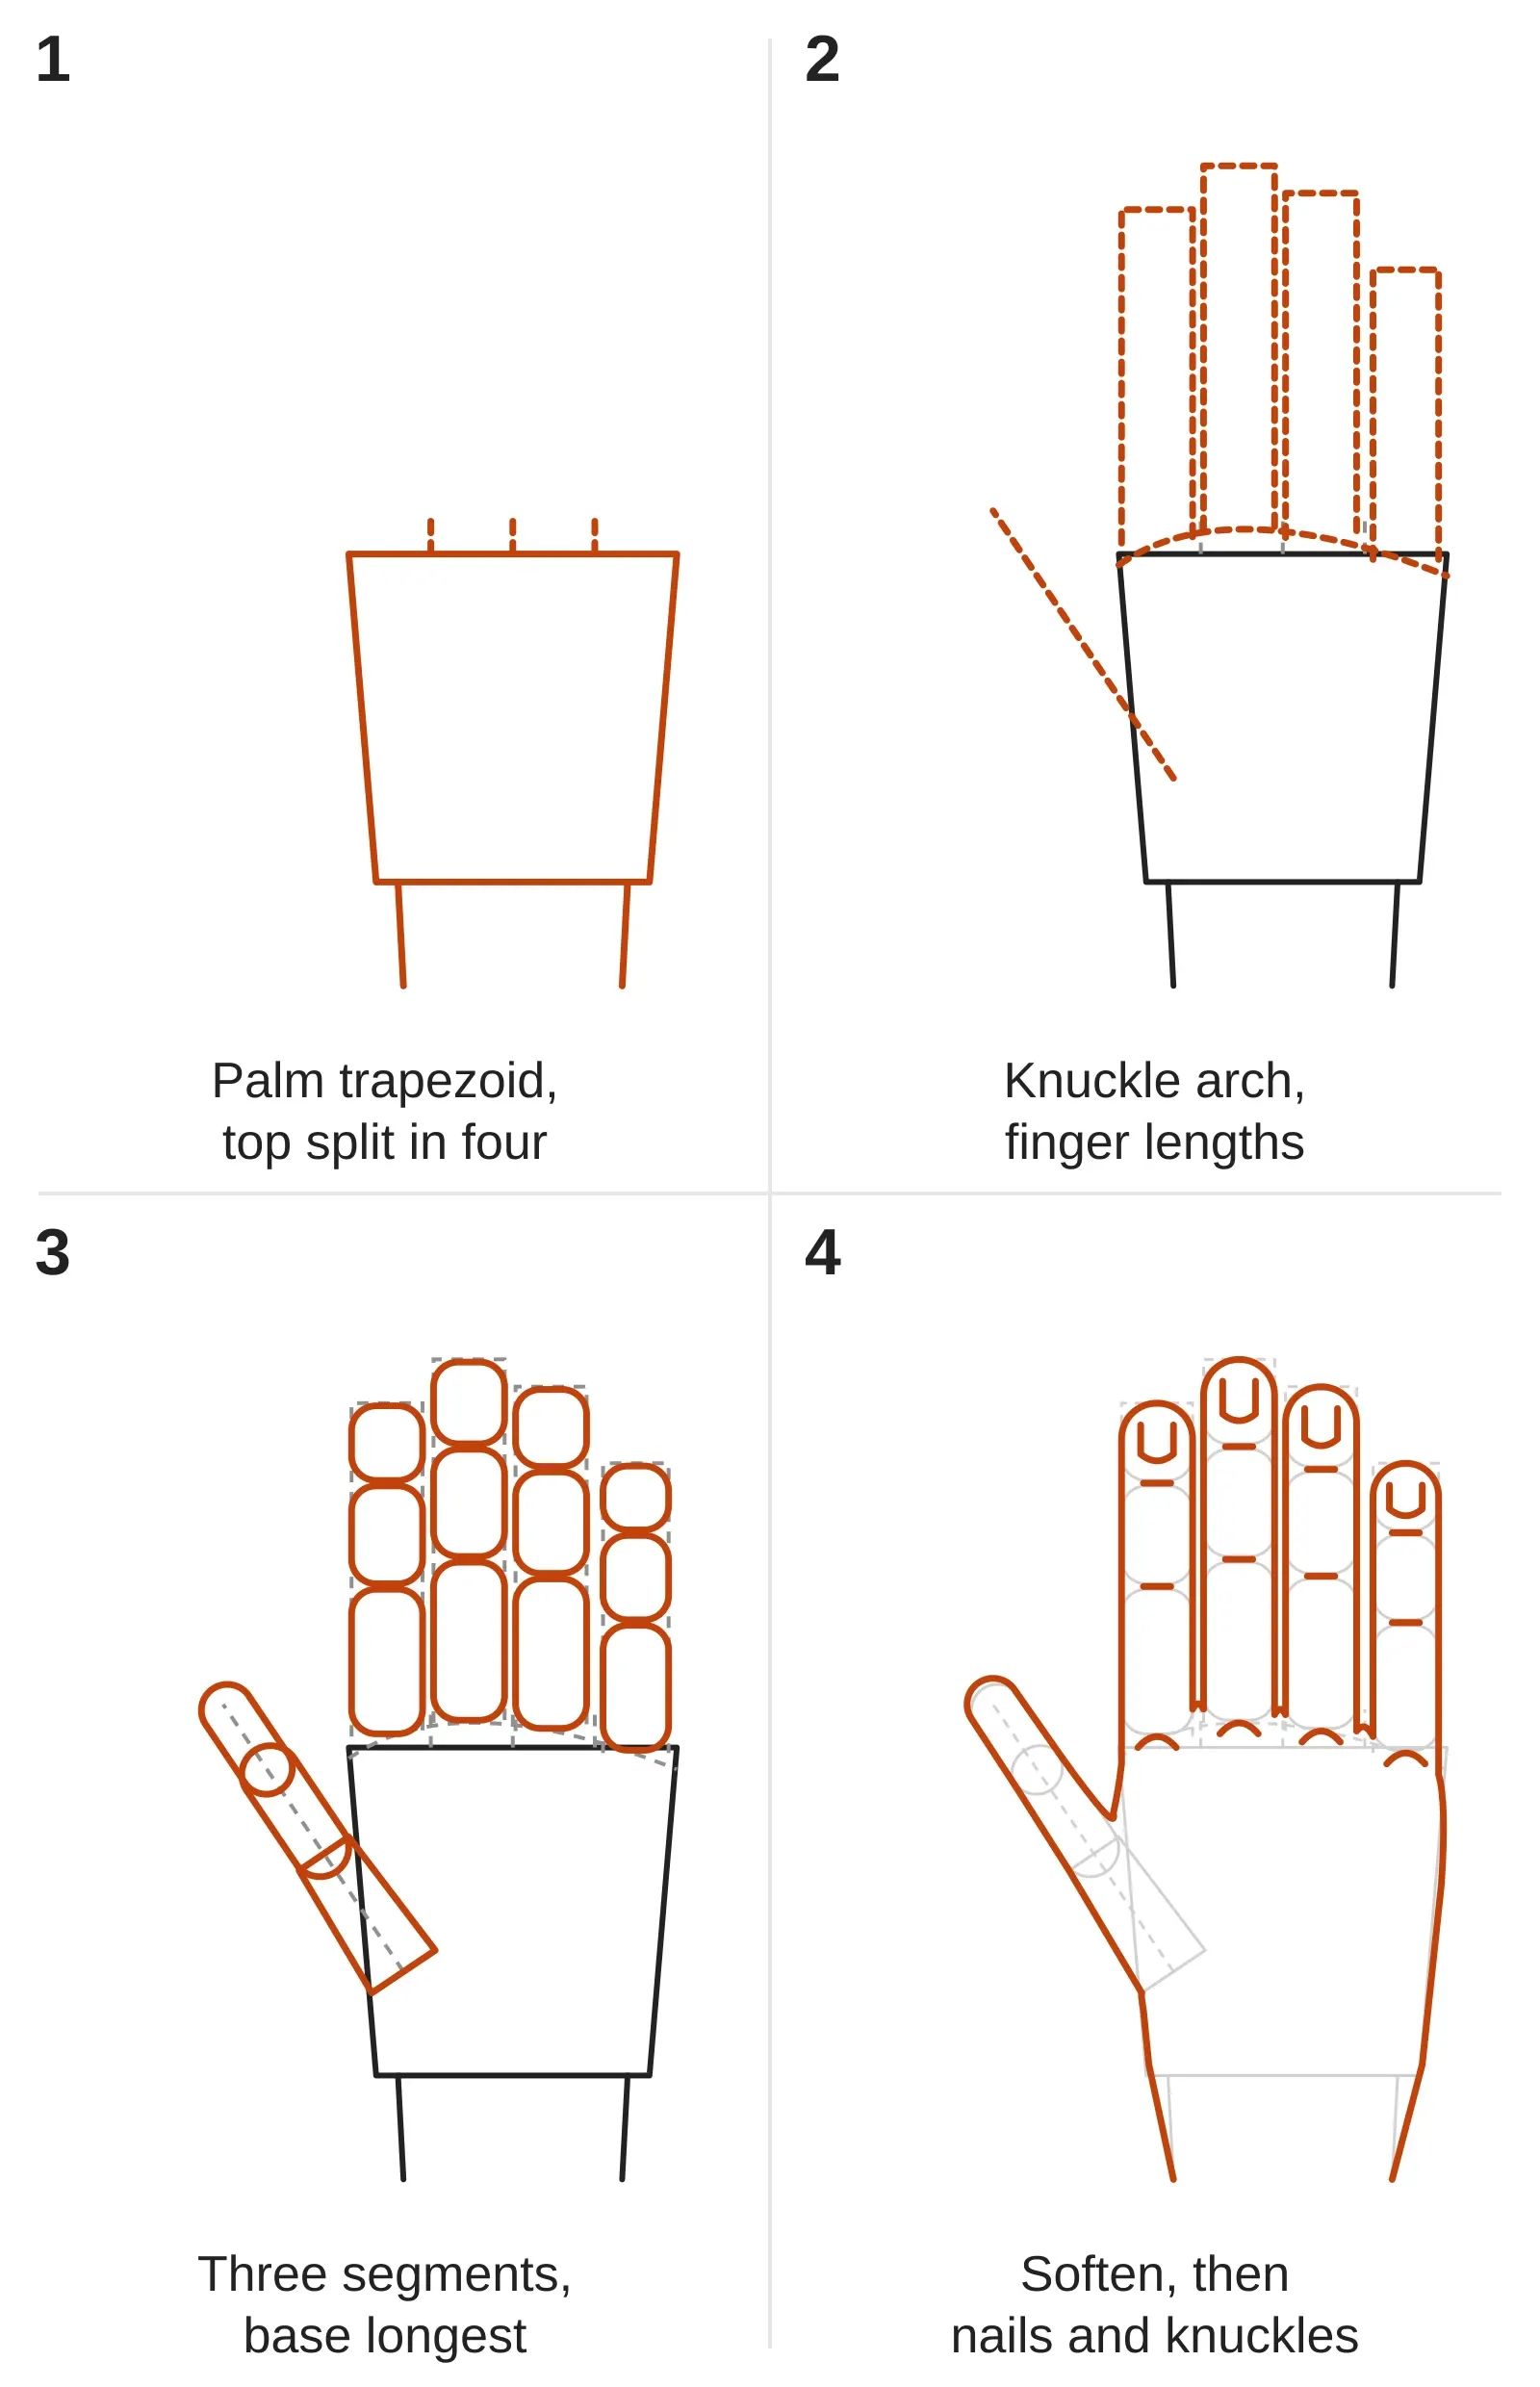
Start with the open hand seen from the back. It shows every proportion at once, so mistakes are easy to spot. Spend your effort on the finger lengths and skip every detail until stage 4.
- Draw the palm. Make a trapezoid, a little wider at the top. Split the top edge into four equal parts. Add two short lines for the wrist.
- Set the finger lengths. Draw a gentle arch over the top edge for the knuckles. Make the middle finger as long as the palm. Then mark the others: index and ring a little shorter, the pinky tip near the ring finger's last joint. Add one light line where the thumb will go, from the lower side of the palm.
- Split the fingers. Give each finger three segments, longest at the base. Build the thumb as a wedge growing out of the palm, then two segments with one bend between them.
- Soften and finish. MsRedNebula's whole trick fits in one line: "To turn this bunch of blocks into a hand, just soften the edges!" Draw one confident outline over the blocks. Knuckles "can be considered as small hills which start at the base of fingers". Nails take up about half of the top segment, with a curved base.
Optional: a first shading pass. Pick one light direction and keep it. Shade the sides of the fingers and of the palm that face away from the light, and leave the knuckle tops light. Proko's lesson also ends with shading the main forms under one chosen light. Proper shading is a lesson of its own, so stop at one light layer.
Stop here and check: put the fingertips on a gentle arc and let the joints step down from the middle finger toward the pinky. Art Rocket gives the reason: "Because the fingers' points of origin and lengths are different, the joints do not line up in a straight line". Spread fingers fan out, too, so they should not all point straight up. Then compare your drawing with the four stages in the diagram below.
Pose 2: the fist
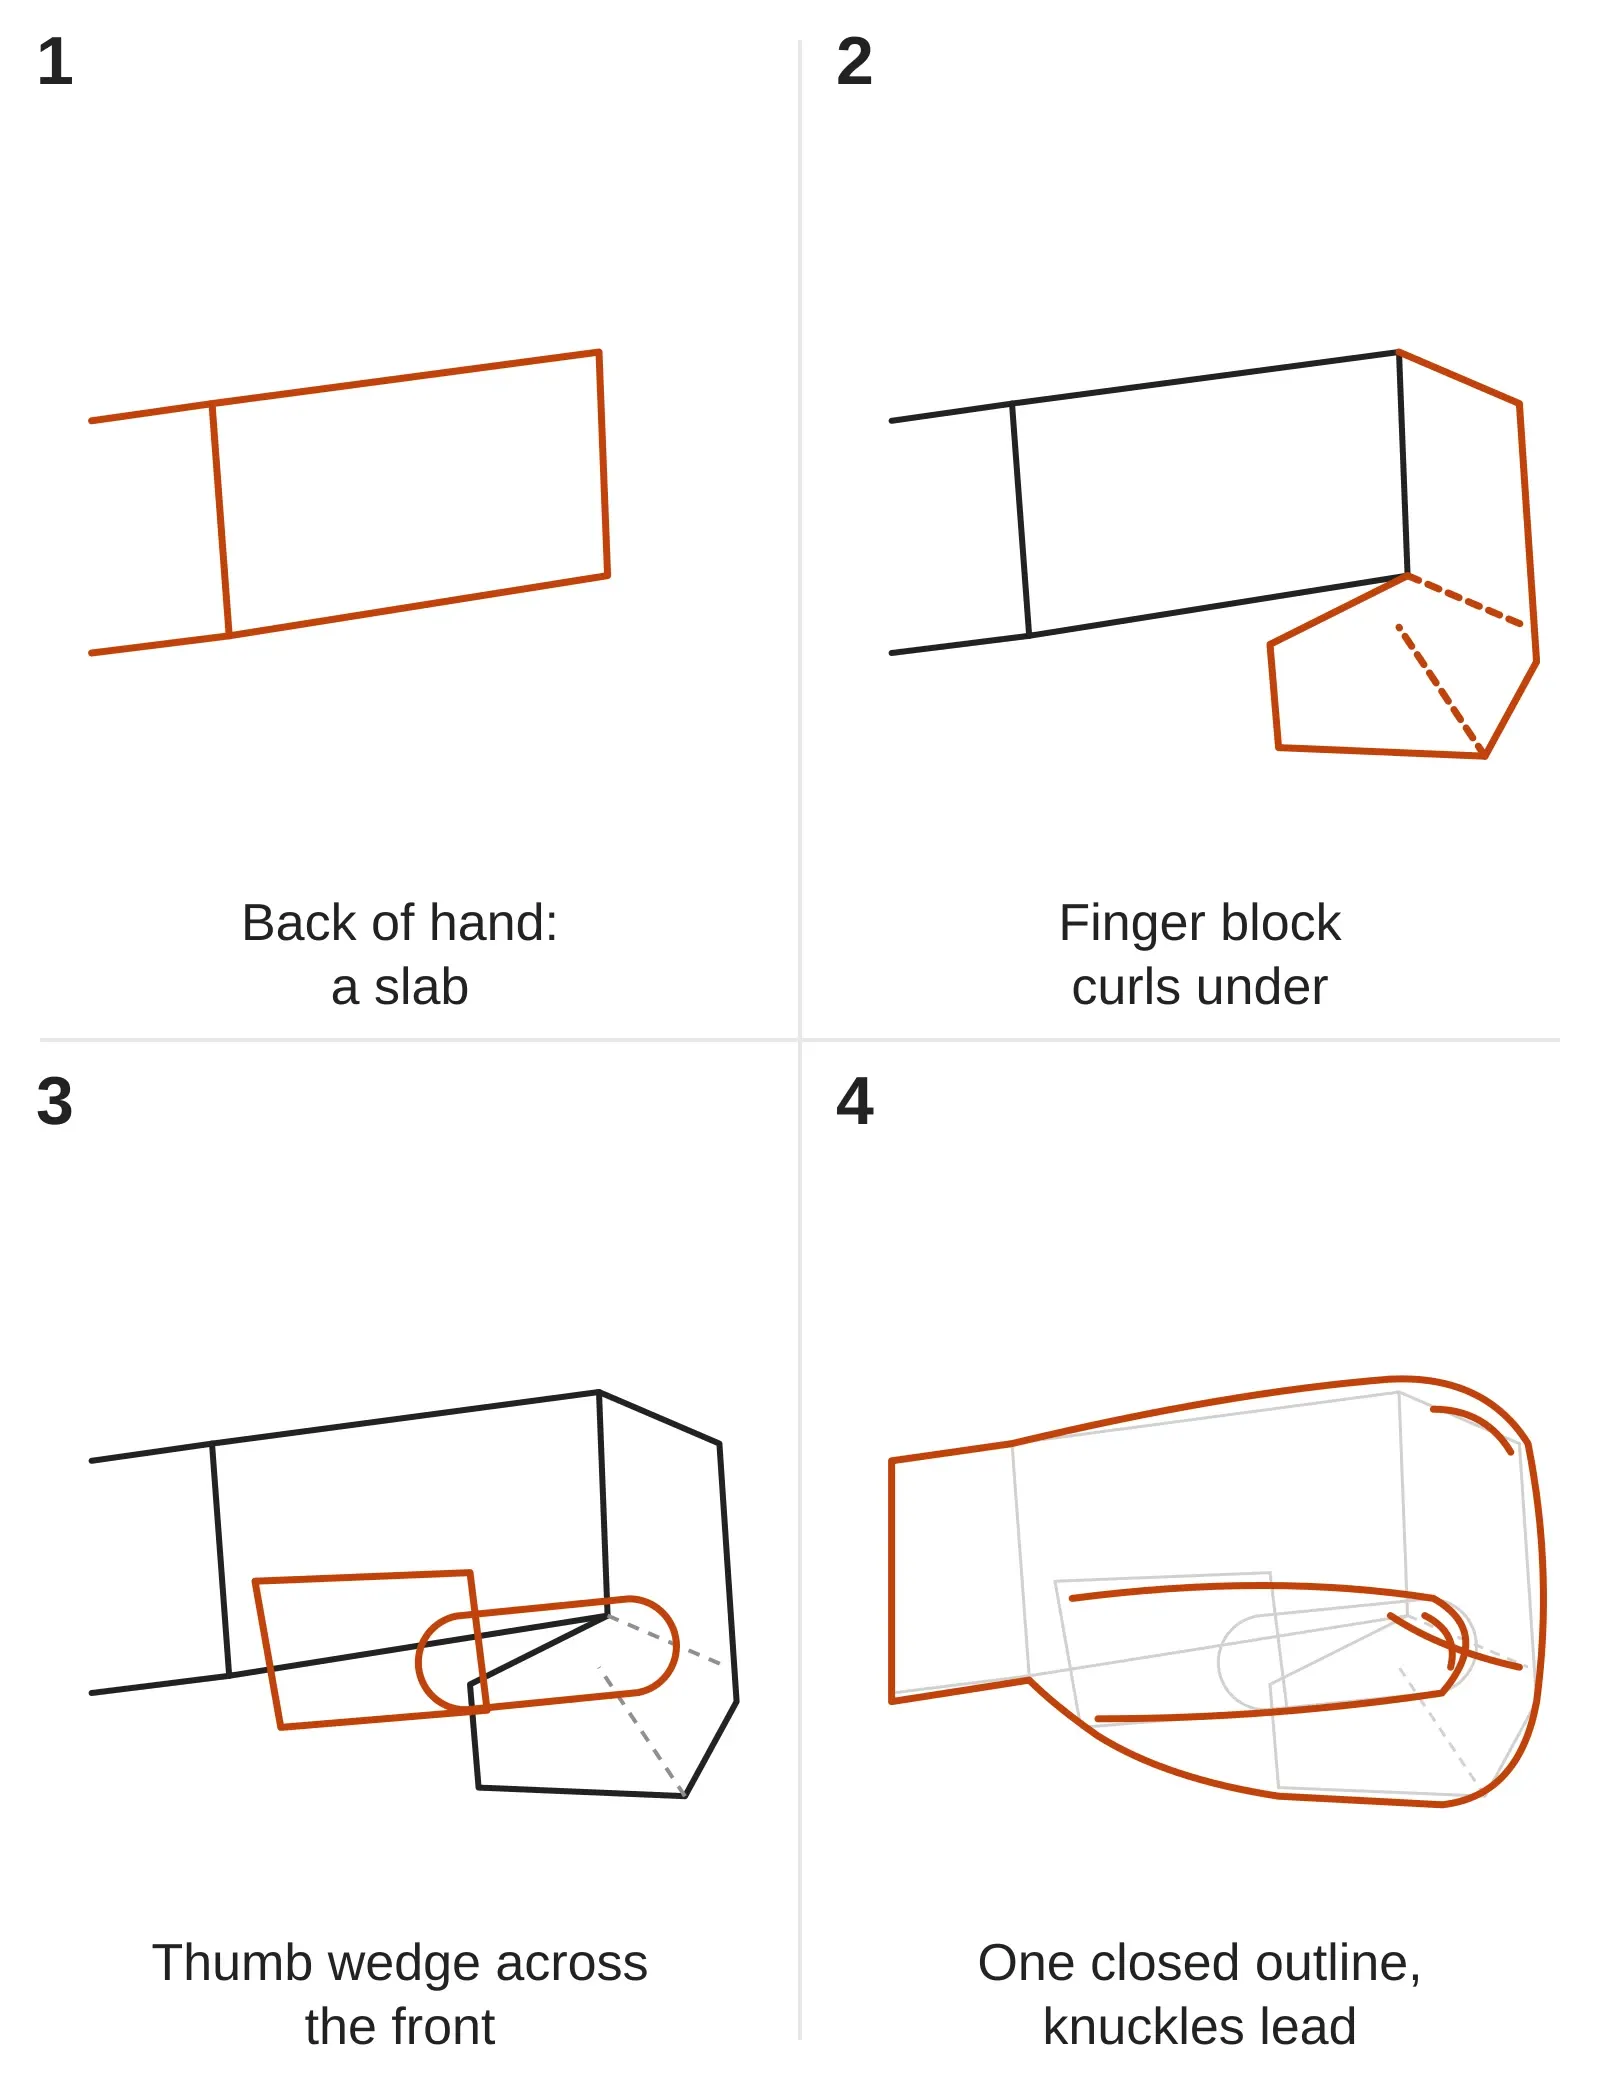
A fist is a slab for the back of the hand, a block of finger segments in front and the thumb wrapped across. Most of each finger disappears from view, which makes it easier than it looks. Spend your effort on the thumb.
- Draw the back of the hand as a slab. LizStaley's fist tutorial on Clip Studio Tips treats this part as "a rectangular shape". Add the wrist lines.
- Add the finger block in front. The first segments of the fingers form the front of the fist. Staley notes that this area "tends to be perpendicular to the palm area", so turn the block down at a right angle. The rest of each finger curls back underneath it.
- Wrap the thumb across. Start with a wedge at the heel of the hand. In Staley's description, the thumb "comes down around the fingers and flexes to tuck in just under" the first knuckles.
- Soften the outline. Keep the knuckles as the leading edge. The other finger segments are "mainly hidden as they curl back", so only hint at them.
Stop here and check: is the palm in proportion to the fingers? Staley's own sketch failed this test: she found "my palm area is out of proportion to the fingers" and fixed it. Also look at the knuckles. Proko's notes say "The knuckles don't line up horizontally". A ruler-straight row makes a fist look stiff. Compare your fist with the four stages in the diagram below.
Pose 3: the pointing hand, side view
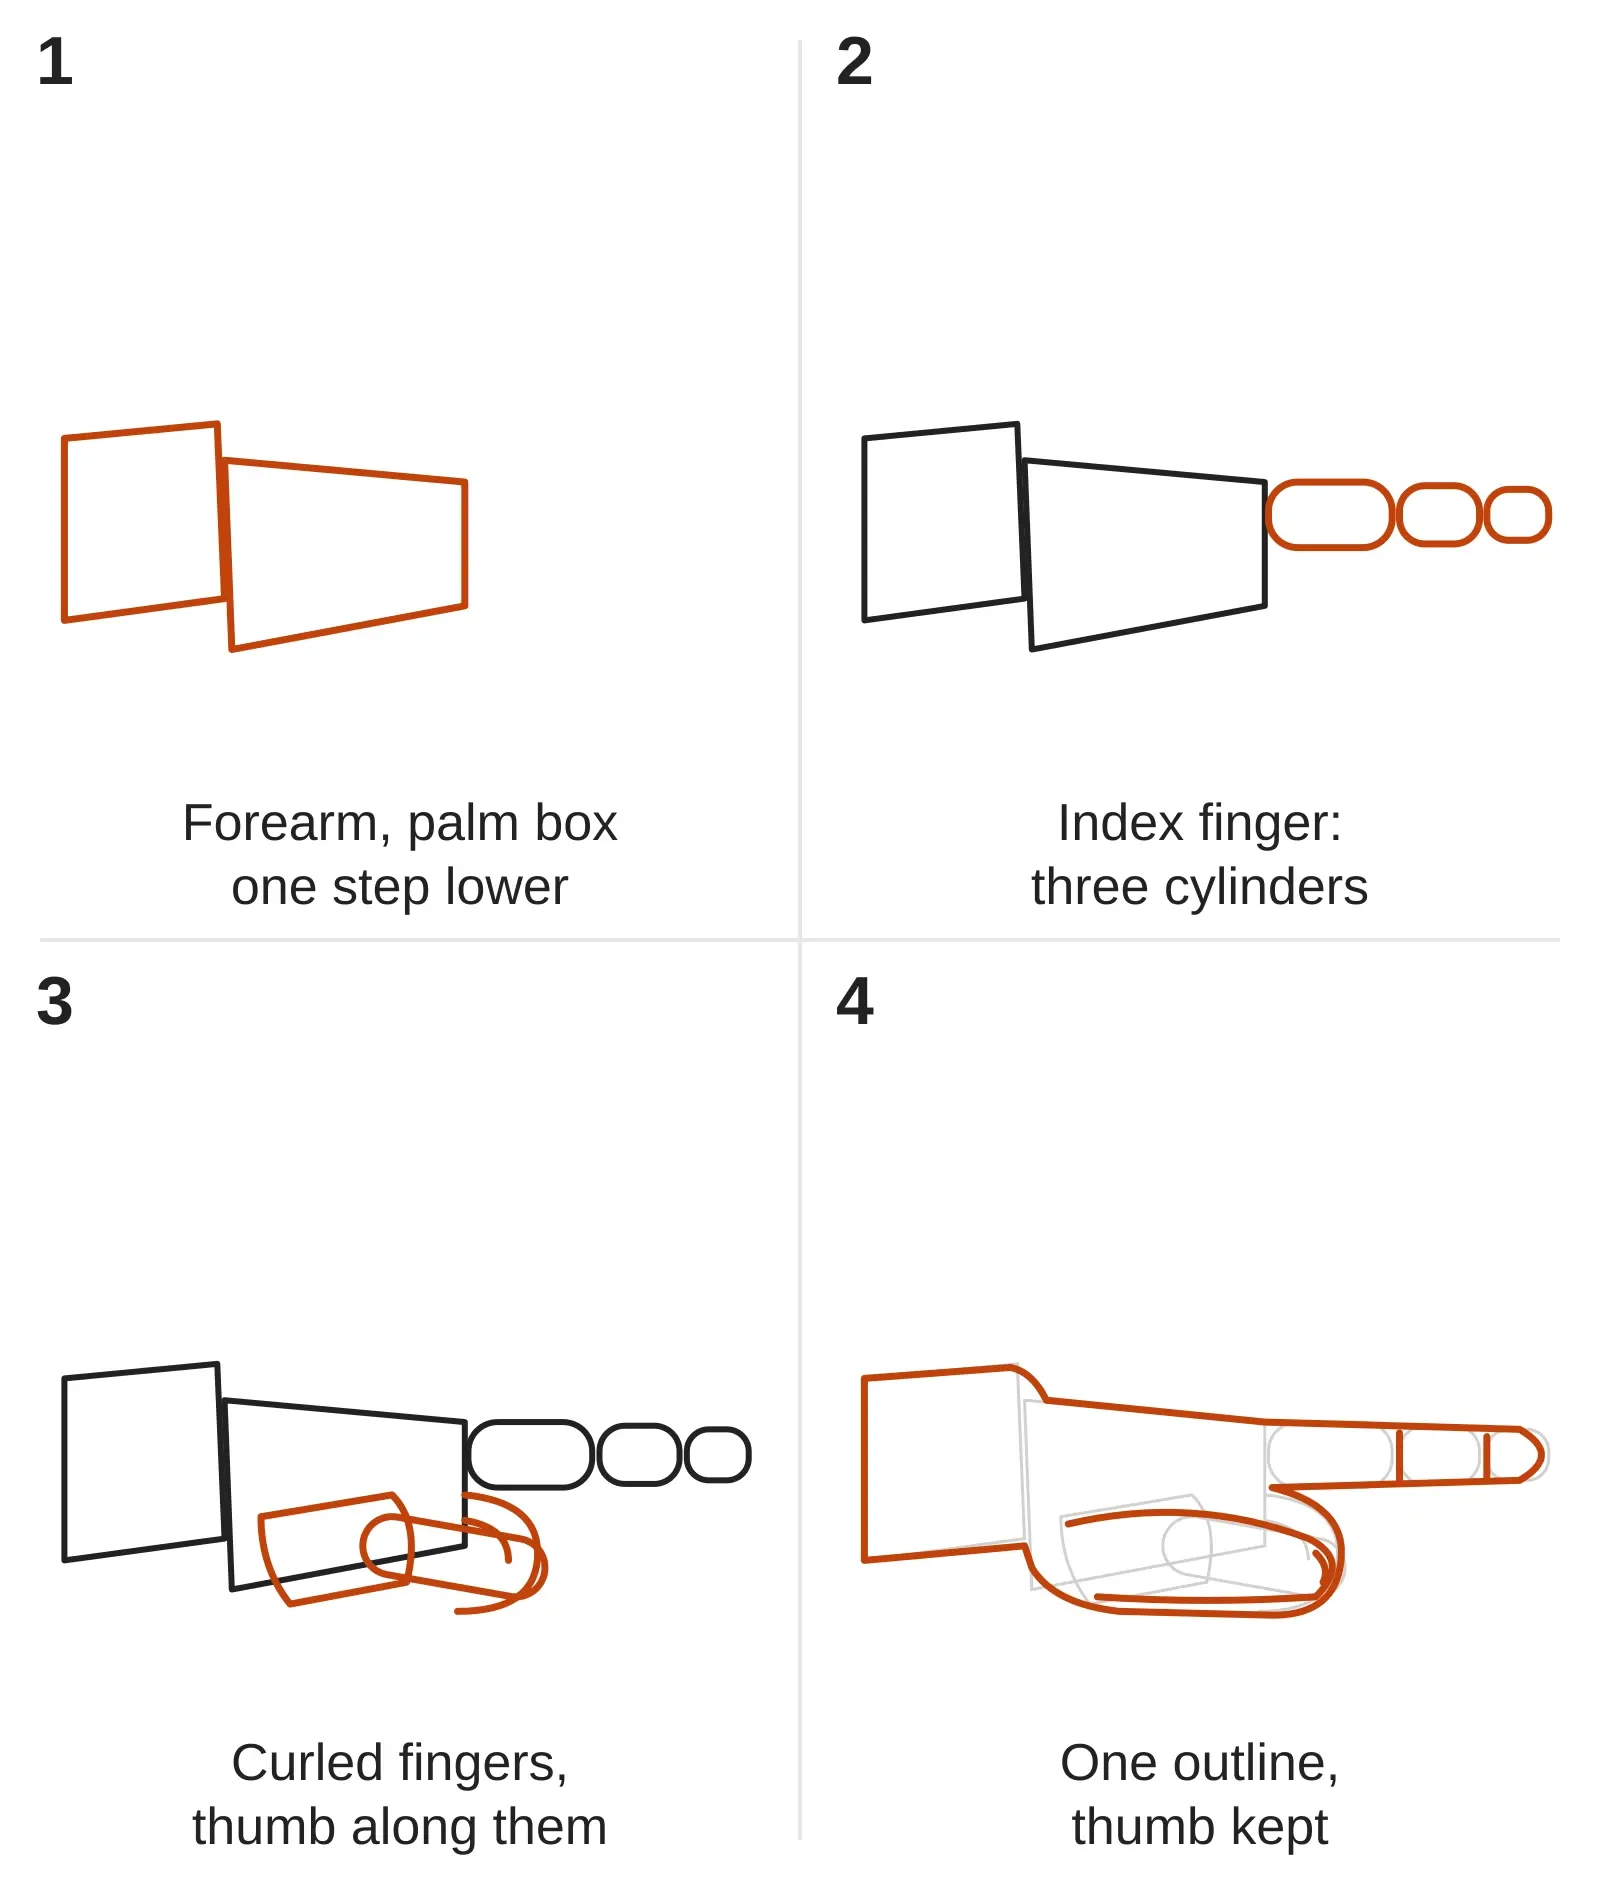
A pointing hand is a forearm block, a palm box set one step lower, one straight finger and three curled ones. The step at the wrist is what makes it look natural. Leave nails and creases for your second try.
- Draw the forearm and the palm. Proko suggests that "a good place to start is the 2x4 form of the forearm bones". Then the key move: "Instead of putting the hand and forearm on the same level, put the hand lower than the forearm."
- Chain the index finger. Three cylinders in a row, longest at the base. Proko counts "12 segments in the fingers, and that doesn't even include the thumb". In this pose only three of them are fully visible.
- Curl the other fingers and add the thumb. Curl the middle, ring and little fingers under the palm in shorter chains. For the thumb, Proko starts with "the triangular box for the base of the thumb" and then says "extend a cylinder for the first phalanx". Rest the thumb along the curled middle finger.
- Soften the outline. One line over the blocks, then a short line at each index finger joint.
Stop here and check: the curled fingers should hide most of their length. If they stick out nearly as far as the index finger, shorten the chains. The thumb should still show in stage 4, lying along the curled fingers, as in the diagram below.
Proportion-error checklist
When a hand looks wrong, the cause is usually one broken rule from the table above. Find the symptom, check the cause and fix that first. Details will not save a block that is the wrong size. Most of the same checks work for cartoon and anime hands. Those styles use the same blocks, just simplified, with fewer joints shown and sometimes only three fingers and a thumb.
Scroll sideways for all 3 columns.
| What looks wrong | Likely cause | Fix |
|---|---|---|
| Fingers too long for the palm | Middle finger drawn longer than the palm | Match the middle finger to the palm, from the bottom of the palm to the top of the knuckle curve |
| Whole hand looks stretched or squashed | Knuckle line in the wrong place | Measure wrist to middle fingertip and put the knuckles at half, on the bone |
| Fingertips in a straight row | All fingers drawn the same length | Shorten the index and ring a little and the pinky more; put the tips on an arc |
| Pinky almost as long as the ring finger | Pinky too long | Bring its tip down to about the ring finger's last joint |
| Fingers look like stacks of beads | Every segment outlined on its own | One soft outline per finger; hanabi02 calls drawing "all the 3 parts of the fingers distinctly" a main beginner mistake |
| Fingers look like sausages | Three equal segments | Make the base segment longest and shorten toward the tip |
| Knuckles in a ruler-straight row | Joints lined up | Step them down from the middle finger toward the pinky |
| Thumb looks stuck on | Too long, or an extra bend | Two segments past the palm bone, one bend, ending just short of the index finger's middle joint |
| Hand too big or too small for the figure | Scale guessed | Compare it with the face: they are about the same length |
| Wrist joins with no step | Hand drawn level with the forearm | Put the hand lower than the forearm |
| Palm-side fingers look too short | Probably nothing | The palm webbing runs about halfway to the first joint; leave them |
| Spread fingers look like parallel sticks | Every finger drawn straight up | Fan them out in different directions |
| Fist looks like a mitten | Thumb at the side, whole fingers drawn | Thumb across the front, first knuckles leading, the rest of the fingers hidden |
| Nails look stuck on | Flat shapes | Nails are not flat: wrap them around the finger and fill about half the top segment |
A small drill for tomorrow
Warm up for 2 to 3 minutes first. Draw your own hand slowly, looking at it more than at the paper, and do not worry about the result. Then photograph your hand three times: open, in a fist and pointing. Draw each one on a quarter of a sheet, stages 1 to 3 only, with no outline and no nails. Then run the checklist above and fix one row per drawing. Start with the open hand, because it shows the most proportions.
If you are following the 8-week drawing plan, this drill is week 7. When hands stop fighting back, take a lighter subject from the easy drawing ideas for a day.